SIP-ALG how to turn off on common routers
SIP ALG uitschakelen
Adtran
Add the following:
no ip firewall alg sip
Arris Gateways
- Go to Advanced > Options.
- Disable (uncheck) SIP.
- Click Apply.
Arris Gateway IP Address: 192.168.0.1
- Username: admin
- Password: motorola
ASA
- Go to policy-map global_policy > class inspection_default.
- Enter:
no inspect sip
ASUS
SIP ALG is located in (via the web interface):
- Go to Advanced Settings / WAN on left side.
- From the tabs across the top, choose NAT Pass through.
- Change SIP pass through to “Disable.” Hit apply.
For phones to pick up the change immediately, reboot each of them, otherwise they will pick up the new NAT table with changes during their next registration.
If your router does not have an option to disable SIP Passthrough then read on…
To disable the SIP ALG manually, you enable telnet to the device via the WWW interface.
Telnet to the device (from a command line enter “telent 192.168.1.1” or the appropriate IP address for the device.)
Issue the following commands:
nvram get nf_sip
(It should return a "1")
nvram set nf_sip=0
nvram commit
RebootThen reboot the router for the changes to take effect.
Cisco
On Cisco devices, SIP-ALG is referred to as SIP Fixup and is enabled by default on both routers and Pix devices. Because this is a default setting, no indication of it being “on” or “off” is visible in the configuration.
To disable SIP Fixup, issue the following commands:
General Routers
no ip nat service sip tcp port 5060
no ip nat service sip udp port 5060
Enterprise-Class Routers
no ip nat service sip tcp port 5060
no ip nat service sip udp port 5060
Pix Devices
no fixup protocol sip 5060
no fixup protocol sip udp 5060
Models: 800 Series
To disable the NAT services for SIP in IOS, just run these commands:
no ip nat service sip tcp port 5060
no ip nat service sip udp port 5060
D-Link
- From the admin interface page of the router, navigate to Advanced settings.
- Under Application Level Gateway (ALG) Configuration, uncheck the SIP option.
Draytek
Voor de modellen: Vigor2750, Vigor2130
SIP ALG staat standaard aan. Mocht je dit willen uitzetten:
- Zorg ervoor dat de computer met de router verbonden is.
- Open een commandline;
- Windows: Start -> Uitvoeren -> type cmd-> enter
- OS X: CMD+spatie -> type terminal-> enter
- Type in deze commandline telnet IP-van-de-routeren druk op enter
- Type de gebruikersnaam in van de modem en druk op enter
- Voer het wachtwoord van de modem in en druk nogmaals op enter
- Voer het volgende in en druk op enter: kmodule_ctl nf_conntrack_sip disable
- Voer het volgende in en druk op enter: kmodule_ctl nf_nat_sip disable
- Als het modem herstart is kunt u testen of VoIP werkt.
Alle andere modellen:
- Zorg ervoor dat de computer met de router verbonden is.
- Open een commandline;
- Windows: Start -> Uitvoeren -> type cmd-> enter
- OS X: CMD+spatie -> type terminal-> enter
- Type in deze commandline telnet IP-van-de-routeren druk op enter
- Type de gebruikersnaam in van de modem en druk op enter
- Voer het wachtwoord van de modem in en druk nogmaals op enter
- Voer het volgende in en druk op enter: sys sip_alg 0
- Als het modem herstart is kunt u testen of VoIP werkt.
Time-To-Live UDP:
Er zijn enkele modellen waar de TTL voor UDP aangepast dient te worden indien gebruik worden gemaakt van het Cloudoe platform:
– Express Office / Hosted Basis: 40 seconden
– HIP / Hosted Extra: 100 seconden
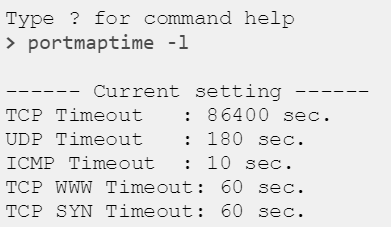
By telnet command “portmaptime -l”, we can check the current value for each application.
To change the NAT timeout value, enter command
portmaptime -[protocol] [time]
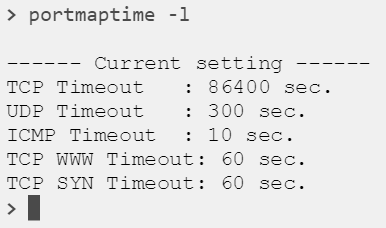
Where [protocol] is a character represents the application (please use command “portmaptime ?” to check the options available), and [time] is a number of seconds. For example, if you’d like to set the timeout value of UDP session to 5 minutes (300 seconds), this can be done by the command
portmaptime -u 300
After that, you may use the command “portmaptime -l” to check if the current value has changed.
Fortinet
Op alle modellen van FortiGate staan SIP helper en Strict SIP Register standaard aan. Het helpt ook om in Traffic Shaping en daarin VoIP aan te zetten.
- Verbroken gesprekken
- Eenzijdige of geen audio
- Sip Register problemen
- Twee SIP telefoons die dezelfde UDP/TCP poorten gebruiken voor SIP/RTP
Verwijder SIP Firewall:
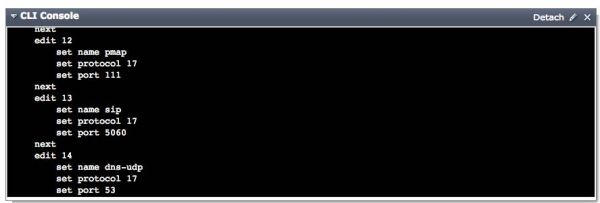
- config system session-helper
- show <---- Gebruik dit commando om te zien welk profiel geconfigureerd is met poort 5060. Die dient verwijderd te worden.
- delete 13
- end
Shakel SIP-ALG en SIP-Helper uit.
- config system settings
- set sip-helper disable (FOS6)
- set sip-nat-trace disable
- set default-voip-alg-mode kernel-helper-based (FOS7)
- end
Bij gebruik van voip profile in de firewall policy:
- config voip profile
- edit default
- config sip
- set rtp disable
- end
Schakel Strict Register uit:
- config voip profile
- edit "Profile Name"
- config sip
- set strict-register disable
- end
Voetnote: De naam van het VoIP profiel kan je vinden onder Security Profile -> VoIP. Als deze settings niet persitent zijn na een een reboot dan zal er een troubleshoot sessie met de support van met FortiGate support nodig zijn.
Configureer Traffic Shaping en VoIP:
1. In de Web GUI, ga naar System > Feature Select > Additional Features.
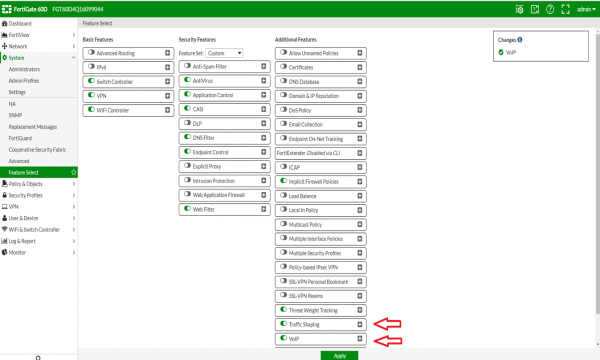
- In de Web GUI, ga naar Policy & Objects.
- Selecteer Objects, daarna Addresses.
- Click op Create New, selecteer dan Addresses.
- Voer hier het subnets van Cloudoe in: 213.207.100.126/27 en 213.207.100.196/32
- In de Web GUI, ga naar Policy & Objects.
- Selecteer Objects, daarne Addresses.
- Click op Create New, selecteer dan Address Group bijvoorbeeld "Cloudoe-VoIP".
- Creëer een Group Name.
- Click Members. en selecteer de objecten die je in het vorige stukje hebt aangemaakt. Daarna click op OK.
- In de Web GUI, ga naar Policy & Objects.
- Selecteer IPv4.
- Creëer een nieuwe policy.
- Definieer als volgt:
- Incoming Interface: Internal (of de interface waar de telefoons op zitten in het geval dat je een Voice Vlan hebt)
- Source Address: All
- Outgoing Interface: WAN
- Destination Address: Cloudoe-VoIP (Het Address Group object wat eerder is aangemaakt.)
- Service: ALL
- Service: SIP, RTP
Juniper / Netscreen
Models: SSG Series
To disable SIP ALG:
In the Web interface: Security -> ALG
Linksys
General Linksys Guidelines
- From the ADMIN page of the router, navigate to [Administration] > [Advanced].
- Look for and disable a SIP ALG option.
Linksys BEFSR41
- From the ADMIN page of the router, navigate to [APPLICATIONS & GAMING] > [PORT TRIGGERING].
- Enter [TCP] as the application.
- Enter [5060] into the Start Port and End Port for both the Triggering Range and Forwarded Range.
- Check Enable.
- Save Settings.
- Reboot IP phone.
Models: WRV200, WRT610N
NAT type: Symmetrical
Issues:
- The ALG replaces the private address in “Call-ID” header (not needed at all). Some phones (as Linksys with latest firmware) encode the “Call-ID” value in the “Refer-To” header (by escaping the dots) so the private IP appearing there is not replaced with the public IP. This causes that the call transfer fails since the proxy/PBX/endpoint will not recognize the dialog info.
To disable SIP ALG:
ToDo no ALG related options found via web and telnet. No idea of how to disable it.
To disable SIP ALG on WRT610N: Web Interface: Administration,
Management, under side heading ‘Advanced Features’ SIP ALG, can be
disabled.
Motorola
Models: SBG6580 (SurfBoard Extreme Wireless Cable Modem Gateway)
- No Registeration possible behind NAT as the device changes Call-ID and causes the responses to be discarded by SIP clients/ATAs
- No Solution at this time (SIP ALG, called SIP Pass Through, can not be disabled) .
- Must disable NAT and put the device in bridge mode. (See this guide)
Netgear
Models: WGR614v9 Wireless-G Router, DGN2000 Wireless-N ADSL2+ Modem Router
Firmware V1.0.18_8.0.9NA
To disable SIP ALG:
- From Wan Setup Menu,
- NAT Filtering,
- uncheck the box next to “Disable SIP ALG”
When setting the Global Default UDP timeout value on a SonicWall firewall, you must still fix the pre-existing rules’ individual UDP timeout values. New rules will inherit the Global Default. Increase the UDP timeout to the suggested 300 seconds both globally on the firewall and the specific out-bound firewall rule (or the default rule, as the case may be).
Peplink Multi-WAN routers
Models: All multi-WAN models
To disable SIP ALG, go to http://<router.LAN.IP>/cgi-bin/MANGA/support.cgi
Click the “Disable” button under “SIP ALG Support”
Issues:
- I’m not aware of any SIP ALG issues, but if you just want to turn it off, here you go.
SMC
Models: ToDo
NAT type: No symmetrical
Issues:
- The ALG doesn’t replace the private address in “Call-ID” header (that is correct) but it does replace the “call-id” value in “Refer-To” header so SIP transfer is broken.
To disable SIP ALG:
ToDo no ALG related options found via web and telnet. No idea of how to dissable it.
SonicWall
- Uncheck the box for Use SIP Header Transformation.
- Disable consistent NAT.
When setting the Global Default UDP timeout value on a SonicWall firewall, you must still fix the pre-existing rules’ individual UDP timeout values. New rules will inherit the Global Default. Increase the UDP timeout to the suggested 300 seconds both globally on the firewall and the specific out-bound firewall rule (or the default rule, as the case may be).
Sophos
The SIP module is turned on by default and provides the following functions for SIP traffic:
- Uses UDP port 5060.
- Translates local IP addresses to public IP addresses, updating the SIP header.
- Enables a dynamic voice channel by setting up an expected voice connection in the firewall.
Turning the SIP module on or off from the command line interface (CLI)
- Sign in to the command line using Telnet or SSH. You can also access it from admin > Console in the upper-right corner of the web admin console.
- Choose option 4. Device Console.
-
Use the following commands.
- Turn on SIP module:
system system_modules sip load - Turn off SIP module:
system system_modules sip unload
Note
The commands are persistent even if the Sophos Firewall is restarted.
- Turn on SIP module:
-
See the SIP module status:
system system_modules show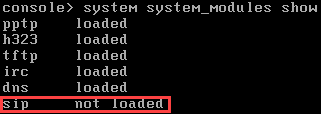
Use a custom port
If you're using a custom port for SIP communication and you want to load the same port under the Sophos helper module, run the below command:
system system_modules sip load ports <custom_port>
TCP support
The Sophos Firewall SIP helper doesn't support SIP and SDP messages spanning more than one packet. This can happen when you are using SIP over TCP.
The workaround is to use a SIP UDP control connection because, in UDP, a single SIP message is a single packet.

UDP time-out value causes VoIP calls to drop or have poor quality
Condition:
Cause:
Remedy:
DoS & spoof protection and VoIP
Condition:
Cause:
Remedy:
SpeedTouch
Models: ST530 v6 (firmware >= 5.4.0.13) comes with SIP ALG enabled by default.
NAT type: symmetrical
Issues:
- No incoming calls.
- It replaces the private IP appearing in SIP headers with the public IP using a dumb text replacement. If for example the private IP appears in the “Call-ID” it replaces it too (that it’s completely unnecessary).
To disable SIP ALG:
~# telnet router
-> connection unbind application=SIP port=5060
-> saveall
UBEE
- Go to Advanced > Options.
- Disable (uncheck) SIP.
- Disable (uncheck) RTSP.
- Click Apply.
Ubiquinti
Model: Edgerouter
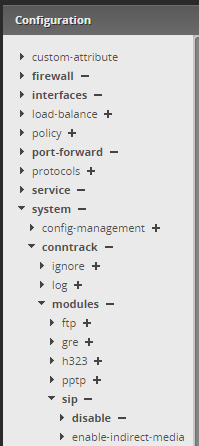
- Open de Config Tree.
- Klap het menu open zoals hieronder aangegeven.
- Klik op + achter disable onder sip.
- Klik onder in beeld op Preview om de instellingen op te slaan.
Zyxel
- Go to Settings > Configuration > Network > ALG.
- Disable SIP ALG.
Note: If you have mixed models of phones like Polycom/Aastra/Cisco/Panasonic, then you may experience difficulty in using ZyXEL ZyWALL routers. However, if you have only Polycom phones, please review this article to learn how to configure ZyXEL ZyWALL routers for use with Polycom phones.
Models: 660 family comes with SIP ALG enabed by default.
NAT type: symmetrical
Issues:
- No incoming calls.
- SIP protocol broken making 50% of outgoing calls impossible because the wrong values are inserted into SIP headers.
To disable SIP ALG:
~# telnet router
Menu option "24. System Maintenance".
Menu option "8. Command Interpreter Mode".
ip nat service sip active 0
Related Articles
SIP Session Timers
Network Working Group S. Donovan Request for Comments: 4028 J. Rosenberg Category: Standards Track Cisco Systems April 2005 Session Timers in the Session Initiation Protocol (SIP) Status of This Memo This document specifies an Internet standards ...Netwerk Vereisten
Poorten en URL's In de meest gunstige situatie is er een apart VLAN of netwerk opgezet voor VoIP, waarbij het datanetwerk en het VoIP-netwerk elk een eigen poort op de router of firewall hebben met een eigen subnet. Voor de beveiliging wordt ...Telecom Wetgeving
Link naar de Telecom Wetgeving. Dit heeft betrekking tot het mogen maken van captures, meesturen van CLID's en terugluisteren van SIP Recordings. wetten.nl - Regeling - Telecommunicatiewet - BWBR0009950 (overheid.nl)Webex for BroadWorks QoS
QoS in Windows for Webex BroadWorks: QoS for Webex for Broadworks is done by means of DSCP. AF46 for Audio en AF34 for Video. These settings can be changed using Costum Tags: %AUDIO_QOS_VALUE_WXT% value 46 (default) %VIDEO_QOS_VALUE_WXT% value 34 ...
